Tuesday, April 30, 2013

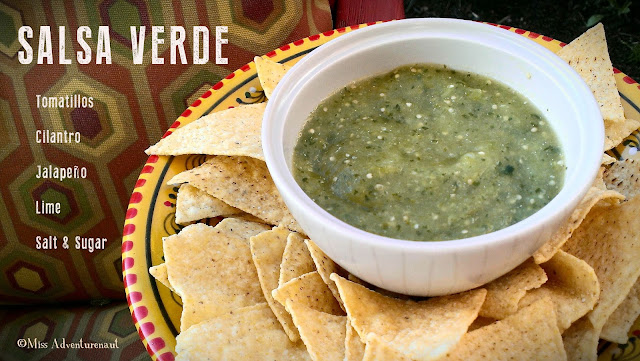
Salsa Verde

After I learned to make these salsas I made them all the time in the summer. But since we've been getting our veggies from a CSA in the autumn and winter, we've only been eating seasonal and local, which is good, but I haven't purchased a tomato or a tomatillo in months. Tragic. I missed fresh salsa. Thank goodness for Cinco de Mayo! For our party I've made two salsas ahead of time, simple verde and roja. Here is a recipe for the "green" salsa.

Salsa Verde Recipe

Tomatillos might be hard to come by in the supermarket depending on where you are. But this is what they look like, little green papery lanterns.

Tomatillos with leaves

The first step is to peel off the sticky leaves and twist off the stem that may be attached. Give them a rinse if some dirt is left behind. Discard the leaves or make something out of them, they sort of look like flowers!

Peeled Tomatillos

Place the tomatillos in a pot of water, enough that they float. Don't crowd them, they need their space. Let the water start to boil. They should become a slightly darker green color and their skins should just start to split. Drain them in a colander and put them back into the pan.

Making Salsa Verde

While you wait for the tomatillos to boil. Roughly chop a small sweet onion, a large handful of cilantro and a deseeded jalapeño. I like things spicy, but to me, salsa verde should be more mild and tangy than leaving you with a spicy burn. So one jalapeño is perfect for me. Add everything into one pot, or a blender, and blend away! Get it to a smooth consistency. When it's blended taste it before adding the finishing ingredients. I use one lime, and about 2 teaspoons each of sugar and salt. Wait for it to cool a bit before you dig in, it will get slightly thicker as it cools.

Making Salsa Verde

Enjoy with chips or over tacos, enchiladas, burritos, anything!

Salsa Verde Recipe


Monday, April 29, 2013

Party Planning: A Weekend in Food & Drink

I'm a planner by nature. And as much as I'd love to throw a party and not think about it too far in advance, I can't. Next weekend we're having a Cinco de Mayo/ Dante's birthday party (an excuse for a fiesta). So this past weekend was spent prepping outside, shopping and making some food in advance. Norristown has a lot of Mexican shops and produce stores where you can get things that aren't available in the supermarket regularly, or at all. We had fun picking out some special things like piñata candy, and fresh poblanos for the party.

For me, prepping food a week before is a time and stress saver. I've started with salsa verde and roja, mini cornbread, and Cilantro syrup for drinks. I also tested a jicama seasoning and the "new to us" gas grill we found on Craigslist. As the week progresses I'll be posting some recipes!

salsa verde and jicama
Salsa Verde and sliced jicama
Cilantro Limeade
Cilantro Limeade
Guitar and Sly Fox Beer
Chris supplies music while I do the grilling. Brought to you by Sly Fox Beer.
Kielbasa, onions, mustard
The grill works! Kielbasa, onions and homemade spicy whiskey mustard.

Mexican Pinata Candy
Piñata Candy
UPDATE 05/07/2013: Emily took some awesome photos at the party, take a look here!

Friday, April 26, 2013

Recommended Listening: Bombino

Bombino artist

This guy. Bombino is a Taureg nomad who has just released an album produced by Dan Auerbach. (Mr. Auerbach is a music producing powerhouse. He's probably produced a few that you didn't even know he anything to do with. Some of my past favorites have been with Grace Potter and the Nocturnals, Jessica Lee Mayfield, Dr. John, Michael Kiwanuka and Blakroc. I think his talent lies in preserving the individual sound, but there's a touch of Dan in everything he does.)

So back to this nomad fella'. Omara “Bombino” Moctar made his Nonesuch record debut with this album, Nomad. A born and raised Nigerian, Bombino is a member of the Tuareg Ifoghas tribe, nomadic desert folk.  As a self taught guitarist, Bombino was heavily influenced by Jimi Hendrix and Mark Knopfler, which is wholly evident in his style. This official video, gives a great look into his music.


If you like this guy you'd probably enjoy Afro Celt Soundsystem or Amadou and Miriam, or even a little Matisyahu.

Thursday, April 25, 2013

Chili and Polenta: Two Days, Two Ways

DAY ONE:

Chili is one of my favorite things to make mostly because I don't think I make the same batch twice. My chili foundations, if you will, are meat, bell peppers, onions, canned tomatoes, beans, and spices. Pretty obvious. I usually will start with ground turkey because it's tender and low in fat. But I had some local grass fed ground beef leftover from our CSA. So last night I made this chili concoction...

The polenta is hiding underneath!
I used:

2 tablespoons of Canola oil
1 lb ground beef
2 red bell peppers
1 red onion
2 tablespoons minced garlic
1 can chili style tomatoes
1 can black beans
About 1 cup of leftover pork shoulder stock, skimmed of fat
1 big glug of Sweet Baby Ray's BBQ sauce
A heaping mound of the following spices in descending order:
  • Adobo
  • Cumin
  • Hot Chili Powder
  • Oregano
  • Cinnamon
Get your garlic browned in the oil in a large pot. Add roughly chopped onions and peppers. Cook until softened. Scooch them out to the perimeter and brown the meat.


Add everything else. Turn the heat down, so that the chili is just bubbling. Simmer, uncovered for about 20 minutes, allowing it to thicken.

In the meantime I made a batch of polenta. I've heard a lot of smack talk about polenta, how it's hard to cook. Apart from a whisking work out, it could not be easier.

Start off with a medium sized pot. In my kitchen, there is no measuring with polenta! I use a quart of low sodium chicken broth. Bring it to a boil. When it's boiling turn the heat down to a simmer. Ground corn meal in it's jar in one hand and whisk in the other, I start to sprinkle in the corn meal. Whisk whisk whisk, until it's dissolved. I keep adding corn meal and whisking until I have to put the corn meal down and hold the pot handle in order to stir. It should be a pudding like consistency. At this point I add some salt, a glug of milk and generous helping of Parmesan cheese. Stir everything together. If you turn off the heat, the mixture will stiffen pretty quickly, so I make sure I make my polenta last, right before I'm ready to serve it up. If there is extra, like tonight, line a baking sheet with parchment and pour out the polenta. It will stiffen quickly. Let it cool and and refrigerate it for later.

Now for this dish, I poured a little polenta in the bottom of the bowl, ladled chili on top, and garnished with crumbled queso fresco and roughly chopped cilantro. When you dig in, it's kinda like a Mexican parfait. Creamy and mild polenta underneath the spicy and textured chili with the fragrant cilantro. Yum.

DAY TWO:

Here's a secret, leftover chili is the best. I guess because all the flavors have time to marinate with one another. Tonight I used leftover chili and polenta. Reheat the chili on the stove top. Start warming a griddle or pan with some oil or butter. I prefer a griddle whenever flipping is involved, gives me lots of space to work with. Take the leftover polenta out of the fridge and using a knife or pizza cutter, slice it up into squares, or pieces. Place the squares on the sizzly griddle and fry each side. The polenta will get more crumbly as it fries so be gentle when flipping. Get each side lightly browned.

Make some lime crema for extra zing. Just mix sour cream and lime juice, bazinga!


Poach the eggs. If you've never poached an egg, (like me!), I found these directions helpful. In the past I've put a fried egg on top, but a poached egg is much more sophisticated and appropriate for this meal. Plate, chili, polenta, egg. Garnish with roughly chopped cilantro and a drizzle of lime crema. Stab the yolky goodness and let it get all over the chili and polenta. Go ahead and just try not to lick the plate clean, impossible!

This would have have been better served in a bowl.

Tuesday, April 23, 2013

Building Our Chicken Coop

Chicken Coop Design

A few weeks ago I was posting about how I have "Chicken Envy" of people with backyard chickens. The chicks we got around Easter have officially come our way, and we made them a pretty sweet home this past weekend. Emily and Chrissy have been graciously brooding the chicks for the past month in their home, probably a little messier than we anticipated. But now that they have their feathers and the nights aren't too cold, they are ready to move outside! They've been living in a giant plastic storage container, so I'm sure they were ready to feel some grass under their little feet. We needed to put our coop plans into action. We still have a bit of finishing touches left, but it's fully functional for the chickens now. Eventually I'll put up plans if anyone would like to try to replicate, "The Penncroft Hen House". (See the building progression after the jump). 

Monday, April 22, 2013

Garden Journal 4.18.13

Bugleweed Red Columbine
sedum Purple Phlox
Saxifrage Tulip


My mom kept a garden journal of when things needed to be planted or divided, landscaping plans, and so forth. I'm not that organized yet, but this weekend I thought I'd start a photo journal of when things bloom.

The new additions this year are the Columbine and the Saxifrage. I'm familiar with Columbine, a beautiful perennial that grows like a wildflower. I never seen Saxifrage before, but I was smitten with the little red flowers, and the mounding quality will look nice around the border of our path. I planted the Phlox last year, and they're in full swing now. And I can't extol the wonderfulness of sedums enough. These low lying ground covers are easy to grow, they take root anywhere from a cutting, and they have beautiful color all year round. What more could you ask for? The Bugleweed is one of those plants that could be considered a weed depending on where they grow. I don't mind them in the middle of our lawn because of the dainty purple flowers, but if you grow them in a bed they're an excellent ground cover that will quickly spread. And lastly the tulips are in full bloom. This is their third year, and I've decided I need to plant three times more of them! I love the differences in color, size, and curly leaves. So Springy.

* As a side note, the real weekend activities were spent building our coop, The Penncroft Hen House! Photos to come...


Friday, April 19, 2013

Las Cazuelas and The Fire: Girard Street, Philadelphia

"It's okay, I'm with the band". My husband, Chris, is a stellar bassist (I can brag because he's so modest). I love watching him play, but it's rough for me staying out late and then being a functioning human at work the next day. All the same, it was a nice Thursday night. We started off at the nearby Las Cazuelas for dinner, a corner Mexican BYOB. We got beef and chicken tacos to share. It was standard fare, but I wasn't blown away by anything. Although, I will say, that our server was awesome. Very friendly and attentive.

The Fire is close by on Girard near Northern Liberties. It's a small bar and venue, with cheap drinks and good music. Chris currently plays with Preston Hull. Give 'em a listen. My favorites are Little Sparks, So This Is The City, and Mariska Hargitay.

Preston Hull at The Fire
Chris, on the right, slappin' da bass.
After Preston Hull, a Boston-based 5 piece played, Dan & The Wildfire. They have a folksy, Lumineers/Mumford & Sons sound, with a trumpet. Lot's of harmonies and great vocals. Check them out!

Dan and The Wildfire at The Fire

This was hanging in the bar. It just may be inspiration for my next embroidery project. 

Embroidery Hoop
Words to live by.


Thursday, April 18, 2013

Sixth Annual Record Store Day

Record Store Day 2013
The Sixth Annual Record Store Day is this Saturday, April 20th. "Record Store Day was conceived in 2007 at a gathering of independent record store owners and employees as a way to celebrate and spread the word about the unique culture surrounding over 700 independently owned record stores in the US and thousands of similar stores internationally." The website has a list of special releases for the day, that will only be available physically in participating record stores. So support your local record store! A few releases I'm interested in...

Calexico, Spirituoso - Includes tracks spanning their career, re-recorded with an entire symphony.
Dawes, Stories Don't End - Their latest 2013 release comes with a limited edition lithograph.

Fun Fact: Chris and I got our first dance wedding song from Medium Rare by The Foo Fighters; a special release for Record Store Day 2010. We really liked the song, This Will Be Our Year, originally by The Zombies but the tempo was just too fast for us to dance to. Dave Grohl must have known and not only covered the song, but serendipitously slowed down the tempo, perfect for our first dance! Our friend even recorded a trumpet solo featured in the original on top of it.

Wednesday, April 17, 2013

DIY Colorful Wrapped Hoop Earrings


Colorful Wrapped Hoop Earrings

I've been seeing these around, and thought, "I can do that!". I have a few pairs of hoops that I don't wear anyway. I wanted to try these first because the shape is a bit more interesting than regular hoops. They're a little rough at the ends, but I was happy with how they turned out for a first attempt.

Colorful Wrapped Hoop Earrings

  1. Start with long lengths (2') of whatever colors you'd like to work with. (I wouldn't suggest any more than 3 colors because it will make your beginning knot too large). Put a the tiniest dab of hot glue at the top, just to hold 'em in place, then knot the threads at the top of the earring. 
  2. Tuck the fringe and begin wrapping your first color around them tightly and evenly. You'll be wrapping around the other threads, but you won't see them because you're wrapping so evenly.
  3. When you want to change colors just pick up the next color and begin wrapping. Remember to consistently wrap in the same direction. Work you way around the hoop.
  4. When you get near the end put another teeny dab at the end and wrap it up before it dries. Tie another knot.
  5. Use small sharp scissors or an Xacto knife to trim the fringe. 
  6. Dab a little clear nail polish on the ends.
  7. I used 2 coats of hairspray all over to keep the thread in place, and I think, to make them slightly more durable without messing with the color or texture of the thread.

Easy huh? I'm thinking of wrapping a plastic bangle next with some thicker thread.


Tuesday, April 16, 2013

Recommended Viewing: Sound of Noise

With Chris sick, our weekend plans were neglected and Netflix was a prime source of entertainment. One film we watched was exceptional, Swedish produced, Sound of Noise. Netflix gives you recommendations based on your own scoring, and this was rated quite high. I put off watching it for awhile because it's subtitled, and sometimes I just don't feel like reading a movie, you know?

In any case  it's about a tone deaf cop from the anti-terrorist unit of a Swedish city, who tracks down the guerrilla percussionists. Sanna, the musical mastermind, arranges for six local drummers to participate in four completely illegal and outrageous musical performances that create music with sounds from the objects in their space. But this is no happy flash mob, kind of performance. These are more like musical heists. For instance, the first movement involves them dressing as surgeons, stealing a patient and a operating room, and using the equipment and the patient as instruments. It sounds ridiculous, but the music actually sounds... good.  This a clip from the hospital performance. No spoilers, but if you enjoy this, you'll love the movie. Additionally you can listen to the soundtrack, here. But I'd warn you to watch the film first before you can fully appreciate the music.


Monday, April 15, 2013

Beef Stroga-knock-off

Friday night was rainy and a bit miserable. Chris was also feeling under the weather, exhibiting flu-like symptoms. Blerg. I wanted to make some chicken soup, but didn't have any chicken, kinda a key ingredient. So I made up something, I think, equally comforting. My mom used to make Beef Stroganoff covering broad egg noodles. Mmm a delicious excerpt from my childhood. And although I didn't have any tenderloin, I did have ground beef. I could work with this... hence the "Stroga-knock-off".

Beef Stroganoff


I used:


1 lb ground beef
1 lb white button mushrooms
1 lb of egg noodles
2 sliced garlic gloves
1/2 cup of frozen peas
1/2 stick of butter
1/3 cup Cinzano, red vermouth
2 cups chicken broth
3/4 sour cream
2 tablespoons Dijon mustard
2 teaspoons onion powder
Salt & Pepper to taste

*This made a lot. About 6-8 servings. I would have liked to use beef broth, onions and fresh dill, but didn't have them on hand.

In a pan melt the butter and add halved mushrooms and sliced garlic. Flip all the mushrooms onto their flat side and on medium heat, allow them to brown. When the flat side is browned, scrape up everything and brown them all over. Also start boiling water for the noodles. 

Mushrooms sauteeing

While the mushrooms did their thing I started my new book, Relish. A graphic novel detailing the authors memories of food throughout her life. She also inserts illustrated recipes throughout. Such an enjoyable read! But back to the beef.

Relish: My Life In The Kitchen

Cook the noodles when the water is ready. Add the ground beef, there should be enough juice and butter leftover so that the beef doesn't stick. Push the mushrooms and garlic to the edge of the pan while you brown and mince the beef.

Mushrooms and Ground Beef in pan

Add the peas, red vermouth, chicken broth, and let it simmer for a bit, until the peas are unfrozen. Then add the sour cream, mustard, onion powder and salt and pepper. Give a stir and let everything simmer together for a few minutes. Adjust the thickness of the sauce by adding more broth or sour cream.

Beef Stroganoff in pan

Your noodles should be ready and waiting to be topped off with the beefy creaminess. Liberally apply cracked pepper.

Beef Stroganoff


Thursday, April 11, 2013

Pizzeria DiMeo's: 8500 Henry Ave, Philadelphia

Pizza. Glorious Pizza. Can I call myself a pizza connoisseur? Sure, I just did. About a year ago, Thrillist recommended this place, Pizzeria DiMeo's. They claim to use ingredients and water shipped from Naples, Italy, the birthplace of pizza as we know it. This is big. I've been there. I have eaten Neapolitan pizza. I had to find out if the pizza even compared. And talk about coincidence, the place is in the very same shopping center that I go for kick-boxing, how convenient? Burn the calories and just pile them back on... I've now dined here a handful of times, and it's a hell of a lot cheaper than flying to Naples for your pizza.

Last night fellow kick-boxer and friend, Julia, and I went for a meal. Using a wood fired oven, the dough is cooked in 90 seconds and prepared by Antimo DiMeo, Pizzaioulo. Yeah, that. Maybe I'll quit my job and try to be Antimo's apprentice...

Pizzeria Dimeo's

There are a lot of styles of pizza, different methods, different tastes. But in all honesty, this is my favorite. Look at that crust!

Pizzeria Dimeo's Capricciosa Pizzeria Dimeo's La Regina Pizzeria Dimeo's Fica

Three pizzas for two ladies?! We ordered with delicious leftovers in mind, and it's also hard to choose between the sumptuous selections. If you go as a first timer, I recommend starting with the classic Margherita, but we wanted to try new flavors...

Capricciosa- San Marzano tomatoes, mozzarella di bufala, prosciutto di parma, mushrooms, artichokes, and Gaeta olives

La Regina - pesto, burrata, cherry tomatoes

Fica - fig spread, burrata, prosciutto di parma, arugula, truffle oil (we dubbed this "dessert pizza" because it's  sweetness)

We decided next time we visit, it'll be a nice sit down meal with some wine (it's a BYOB), not a sweaty post kick-boxing feast. There were some mighty fine looking pasta dishes that I'd love to try. We also learned that they're coming up on their one year anniversary. Congrats, DiMeo's, and keep it the good work!

Wednesday, April 10, 2013

Bathroom Renovation: Ideas

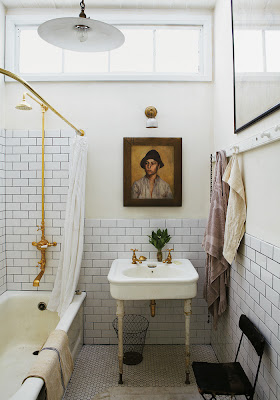
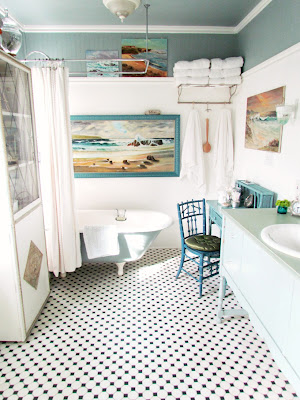
I hate our bathroom. It's both a style and health hazard. Moldy grout just won't get white no matter how much scrubbing, the paint on the ceiling chips because there's no fan ventilation, and the faux wood linoleum bubbles up around the edges. Ugh. It's the one room in the house that has needed a total renovation, so of course we've put it off the longest. Even though we'll be doing it ourselves, and doing it in the most economical way possible, it's still a big spend for us. Additionally we've only just put in a half bath in the basement, so going a week or so without a usable bathroom wasn't feasible. But now there's no more excuses! The bathroom is getting a makeover this summer and here are a few of my design inspirations.

Things I definitely want:
  • Black and White honeycomb floor tiles
  • White Subway tiles in the bath
  • Dark grout 
  • Marine blue walls
  • A plant stand in the window
Tiffany Blue Bathroom
Wainscoting may be a cheaper option to tile
White subway tile bathroom
Dark grout makes the tiles pop

Ikea bathroom
Dark wood shelving and vanities and contrast against the white


Turquoise Bathroom
A warm marine blue as an accent
Trailing vine plant in bathroom
Plants keep it fresh
I like the style of the classic black and white tiled bathroom. It's clean looking and will have a better resale value than getting too personal or trendy. We also get great natural light from a south facing window. I'd like to be able to keep a few plants in there for a element of green, and the plants love it too. I think I'm leaning toward nautical accents. Not beachy nautical but Jules Verne nautical. Inspired by this gifted octopus hook, below, from Anthropologie. (From our friend Lucy, who has a food-porn-worthy blog). I also love this little "Dauntless Seafarer", from Etsy. "Stormy waters, and narwhals? Pshhht".


We hope to get started in the next month before the weather gets all summery and hot and the prospect of indoor renovation becomes too daunting. I'll keep you posted on the progress!

Tuesday, April 9, 2013

Gentleman Farmers

I've just finished The Bucolic Plague: How Two Manhattanites Became Gentlemen Farmers: An Unconventional Memoir (P.S.). It was initially bought on my phone as a time filler, but soon I found that I just couldn't put it down. It's the story of how a Manhattan power couple risked it all by purchasing a literal mansion in upstate New York. The siren call of simple pastoral life was too strong for Josh, an ad agent, and Brent, who worked for Martha Stewart Omnimedia. The picturesque property is complete with 200 years of history, a barn, and a family crypt. They quickly found themselves as weekend gentlemen farmers growing their own food and raising a barnful of goats. Soon what was meant to be a weekend getaway becomes a road to full time mansion life, selling homemade products from the farm and blogging about it. The book chronicles their adventure transitioning into farm life, creating the brand Beekman 1802, and what it takes to keep the dream alive.

Monday, April 8, 2013

DIY Raised Beds

DIY raised beds

We took advantage of the gorgeous weather this weekend and got to work outside. We've wanted to put in some raised beds for a vegetable garden and finally got around to it this year. The past two summers I grew a few herbs and other plants in pots, but that just wasn't enough! Raised beds seem to be easier. It's easier for the plants to grow in the loose topsoil, easier to protect from animals stopping by for a snack, easier to keep weed free, and easier on your back as you harvest your bounty. I like easy. We determined the perfect spot for them getting the maximum amount of sun, next to our detached garage. Eventually the chicken coop will go there too so the chickens will be able to hang out in the garden. We decided on making three 3x10" frames. The narrow bed will allow easy access on all sides. Each is made with 4x4 posts and two 2x6 beams stacked on top of each other.

Materials Used (For one bed):

(1) 8' 4x4 Cedar
(6) 10' 2x6 Douglas Fir
(32) Epoxy coated decking screws
(3) Brown paper yard waste bags
About one half a yard of vegetable topsoil

Tools Used:

Miter Saw
Power drill
Post hole digger
Shovel
Spray Paint
Tape Measure
Pencil

Step One:
Plan where to put your bed(s). You'll want a spot that gets at least 4-5 hours of sun a day.

Step Two:
Consider your materials. We decided to use non-pressure treated wood in our beds. This makes the lumber considerably more expensive, but call me crazy, I didn't want chemicals eeking into our homegrown food. We got our wood at a home improvement store, and the non-pressure treated options were fir and cedar for the sizes we needed. An employee also informed me that animals don't like the smell of the cedar wood, so bonus. Be certain to look down the end of each board to get the straightest pieces possible.

Step Three:
This is a given, but as you gather your materials, also make sure you have all your tools ready to go. I hate when I have to stop a project because I forgot about a certain component.

Step Four:
Measure your wood, and cut your pieces with a miter saw. You'll be working with four 10' 2x6 boards, four 3' 2x6 boards and four 2' 4x4 pieces.

  man using miter saw

Step Five:
Assemble the end pieces. Lay down two 4x4 pieces and place two short 2x6 pieces on top. Use a level to line up the sides and the ends. Because you measured accurately, they'll line up perfectly. Screw in two decking screws on each end. We started using regular screws, and quickly realized our mistake. The epoxy coated decking screws won't rust and the square head doesn't strip the screw head as you drill it into the wood. Continue to assemble both end pieces.

man using power drill

Deck Fast epoxy coated screws


Building a raised bed

Step Seven:
Balance your end pieces on their sides and lay the two 2x6 boards down (this will be much easier with two people). Arrange the boards so that there is as little space in between them as possible. At this point you have the option to leave a corner gap or line them up evenly. We chose to leave the corner gap so we can place bamboo stakes in the corners for netting around each bed. Two screws per end again. Flip it over carefully and add the last two boards.

Building a raised bed

Step Eight:
At this point the bed is assembled, now you have to get it in the ground. The purpose of the 4x4s is to anchor the beds. We placed the bed exactly where we wanted it to go then spray painted around the feet. Now we know where to start digging! I'd say this is the most labor extensive part. Our yard has a lot of stones and gravel so we started the hole with a shovel and finished it with a post digger. You could certainly do it all with a shovel but it's a little more work that way. When the holes are dug about a foot deep, lift the bed and place the legs in the holes. If your bed isn't laying flat you might have to even out the ground by digging chunks in certain spots.

Foot of raised bed


Step Nine:
In order to minimize weeds in the veggies it's important to line the bed with newspaper or landscaping fabric. Remember when I said "make sure you have all your materials first"? I forgot about this part, so instead of newspaper we used large brown paper yard waste bags that we had on hand. It'll do the same job, but a stack of newspapers probably would have been cheaper.

lining a raised bed


Step Ten:
Time to add your topsoil! There are lots of different kinds of "dirt". Since we made three beds, buying bags of topsoil from Home Depot would have been silly. We got a yard of a vegetable topsoil mix from a local landscaping supplier. A "yard" of dirt is the measurement of a cubic yard. So whip out your calculator and multiply length x width x height to find the volume of the bed. A yard also happens to be about a "truckful".

Topsoil in a raised bed

Stages of building a raised bed

Chihuahua in a wheelbarrow


This only took 4 hours from start to finish, with a lunch break in between. It's a really simple project and much easier than I anticipated. Now you can plant your seeds or plants in their new home. I planted some lettuce, carrots and onions right away!