

Showing posts with label home improvement. Show all posts
Showing posts with label home improvement. Show all posts
Tuesday, November 12, 2013
DIY Mason Jar Pendant Lamp
If you're ever on Pinterest surely you've seen a version of this, a million times. But I liked the look, and we wanted to replace the pendants that came with the kitchen without spending too much. I looked into changing just the glass shade but nothing would fit properly. A decent-looking full pendant assembly costs at least $50 per lamp, and we needed three. Making our own mason jar lamps looked like a good alternative at a cost of $20 a piece. Worth it!


Tuesday, April 23, 2013
Building Our Chicken Coop

A few weeks ago I was posting about how I have "Chicken Envy" of people with backyard chickens. The chicks we got around Easter have officially come our way, and we made them a pretty sweet home this past weekend. Emily and Chrissy have been graciously brooding the chicks for the past month in their home, probably a little messier than we anticipated. But now that they have their feathers and the nights aren't too cold, they are ready to move outside! They've been living in a giant plastic storage container, so I'm sure they were ready to feel some grass under their little feet. We needed to put our coop plans into action. We still have a bit of finishing touches left, but it's fully functional for the chickens now. Eventually I'll put up plans if anyone would like to try to replicate, "The Penncroft Hen House". (See the building progression after the jump).
Monday, April 22, 2013
Garden Journal 4.18.13
 |
 |
 |
 |
 |
 |
My mom kept a garden journal of when things needed to be planted or divided, landscaping plans, and so forth. I'm not that organized yet, but this weekend I thought I'd start a photo journal of when things bloom.
The new additions this year are the Columbine and the Saxifrage. I'm familiar with Columbine, a beautiful perennial that grows like a wildflower. I never seen Saxifrage before, but I was smitten with the little red flowers, and the mounding quality will look nice around the border of our path. I planted the Phlox last year, and they're in full swing now. And I can't extol the wonderfulness of sedums enough. These low lying ground covers are easy to grow, they take root anywhere from a cutting, and they have beautiful color all year round. What more could you ask for? The Bugleweed is one of those plants that could be considered a weed depending on where they grow. I don't mind them in the middle of our lawn because of the dainty purple flowers, but if you grow them in a bed they're an excellent ground cover that will quickly spread. And lastly the tulips are in full bloom. This is their third year, and I've decided I need to plant three times more of them! I love the differences in color, size, and curly leaves. So Springy.
* As a side note, the real weekend activities were spent building our coop, The Penncroft Hen House! Photos to come...
Wednesday, April 10, 2013
Bathroom Renovation: Ideas
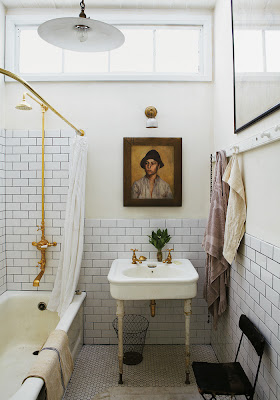
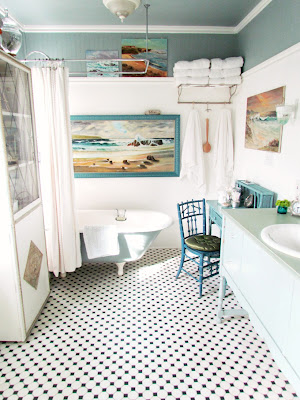
I hate our bathroom. It's both a style and health hazard. Moldy grout just won't get white no matter how much scrubbing, the paint on the ceiling chips because there's no fan ventilation, and the faux wood linoleum bubbles up around the edges. Ugh. It's the one room in the house that has needed a total renovation, so of course we've put it off the longest. Even though we'll be doing it ourselves, and doing it in the most economical way possible, it's still a big spend for us. Additionally we've only just put in a half bath in the basement, so going a week or so without a usable bathroom wasn't feasible. But now there's no more excuses! The bathroom is getting a makeover this summer and here are a few of my design inspirations.
Things I definitely want:
- Black and White honeycomb floor tiles
- White Subway tiles in the bath
- Dark grout
- Marine blue walls
- A plant stand in the window
|
|

 |
| Dark wood shelving and vanities and contrast against the white |
|
|

 |
 |
We hope to get started in the next month before the weather gets all summery and hot and the prospect of indoor renovation becomes too daunting. I'll keep you posted on the progress!
Monday, April 8, 2013
DIY Raised Beds

We took advantage of the gorgeous weather this weekend and got to work outside. We've wanted to put in some raised beds for a vegetable garden and finally got around to it this year. The past two summers I grew a few herbs and other plants in pots, but that just wasn't enough! Raised beds seem to be easier. It's easier for the plants to grow in the loose topsoil, easier to protect from animals stopping by for a snack, easier to keep weed free, and easier on your back as you harvest your bounty. I like easy. We determined the perfect spot for them getting the maximum amount of sun, next to our detached garage. Eventually the chicken coop will go there too so the chickens will be able to hang out in the garden. We decided on making three 3x10" frames. The narrow bed will allow easy access on all sides. Each is made with 4x4 posts and two 2x6 beams stacked on top of each other.
Materials Used (For one bed):
(1) 8' 4x4 Cedar(6) 10' 2x6 Douglas Fir
(32) Epoxy coated decking screws
(3) Brown paper yard waste bags
About one half a yard of vegetable topsoil
Tools Used:
Miter SawPower drill
Post hole digger
Shovel
Spray Paint
Tape Measure
Pencil
Step One:
Plan where to put your bed(s). You'll want a spot that gets at least 4-5 hours of sun a day.
Step Two:
Consider your materials. We decided to use non-pressure treated wood in our beds. This makes the lumber considerably more expensive, but call me crazy, I didn't want chemicals eeking into our homegrown food. We got our wood at a home improvement store, and the non-pressure treated options were fir and cedar for the sizes we needed. An employee also informed me that animals don't like the smell of the cedar wood, so bonus. Be certain to look down the end of each board to get the straightest pieces possible.
Step Three:
This is a given, but as you gather your materials, also make sure you have all your tools ready to go. I hate when I have to stop a project because I forgot about a certain component.
Step Four:
Measure your wood, and cut your pieces with a miter saw. You'll be working with four 10' 2x6 boards, four 3' 2x6 boards and four 2' 4x4 pieces.

Step Five:
Assemble the end pieces. Lay down two 4x4 pieces and place two short 2x6 pieces on top. Use a level to line up the sides and the ends. Because you measured accurately, they'll line up perfectly. Screw in two decking screws on each end. We started using regular screws, and quickly realized our mistake. The epoxy coated decking screws won't rust and the square head doesn't strip the screw head as you drill it into the wood. Continue to assemble both end pieces.


Step Seven:
Balance your end pieces on their sides and lay the two 2x6 boards down (this will be much easier with two people). Arrange the boards so that there is as little space in between them as possible. At this point you have the option to leave a corner gap or line them up evenly. We chose to leave the corner gap so we can place bamboo stakes in the corners for netting around each bed. Two screws per end again. Flip it over carefully and add the last two boards.

Step Eight:
At this point the bed is assembled, now you have to get it in the ground. The purpose of the 4x4s is to anchor the beds. We placed the bed exactly where we wanted it to go then spray painted around the feet. Now we know where to start digging! I'd say this is the most labor extensive part. Our yard has a lot of stones and gravel so we started the hole with a shovel and finished it with a post digger. You could certainly do it all with a shovel but it's a little more work that way. When the holes are dug about a foot deep, lift the bed and place the legs in the holes. If your bed isn't laying flat you might have to even out the ground by digging chunks in certain spots.

Step Nine:
In order to minimize weeds in the veggies it's important to line the bed with newspaper or landscaping fabric. Remember when I said "make sure you have all your materials first"? I forgot about this part, so instead of newspaper we used large brown paper yard waste bags that we had on hand. It'll do the same job, but a stack of newspapers probably would have been cheaper.

Step Ten:
Time to add your topsoil! There are lots of different kinds of "dirt". Since we made three beds, buying bags of topsoil from Home Depot would have been silly. We got a yard of a vegetable topsoil mix from a local landscaping supplier. A "yard" of dirt is the measurement of a cubic yard. So whip out your calculator and multiply length x width x height to find the volume of the bed. A yard also happens to be about a "truckful".


This only took 4 hours from start to finish, with a lunch break in between. It's a really simple project and much easier than I anticipated. Now you can plant your seeds or plants in their new home. I planted some lettuce, carrots and onions right away!
Monday, March 18, 2013
My Dr. Bronner's PSA
It's almost time for "Spring Cleaning", when we can open windows and let the fresh air come in. I like to take the opportunity to really do an intense cleaning of the house, because I'll be honest, I don't do it that often. It's been a few years since I've been trying to switch out all of our harsh chemicals in the house to more natural options. And my first lesson was in the benefits of Castile soap, which is a type of soap made from a vegetable oil base. A very popular brand is Dr. Bronner's, and for good reason. It comes in a variety of scents, which are derived from natural oils like ones shown below. It's mild, yet powerful, and is useful in so many ways. Here is a few ways I use it...


Tuesday, March 12, 2013
Chicken Envy
 |
| Photo Credit: Joe Sartore |
- Do I really have time to care for these?
- There are a million and one other home projects that should take time/money precedence
- Technically speaking it's not legal to own farm animals on less than 2 acres in my Suburbia
But still, I want chickens! I love the thought of fresh eggs and just having some more animals around besides Dante and my husband (badum pshh). About a year ago we put an offer in for a parcel of land in the Mojave Desert with the intent to eventually move and live sustainability "off the grid". You can view the mini tour here. Maintaining some livestock was obviously in the planning, but even though that California Dream fell through I still would like to have some chickens. And a goat or two. And bees. And a Tilapia pond. But I digress...
Chickens! No loud rooster, just tiny bug-eatin', compost-makin', egg producers. Sigh. So while I lust over others' chickens I will continue to do research and plan. We'd probably build our own coop, but here are few designs I like, from simple to elaborate (for super posh chickens).
Here are some of the chicken rearing resources I've been looking at:
 |
| Chicken Direct Aston Chicken Coop |
 |
| Williams-Sonoma Rustic Coop & Run |
 |
| Williams-Sonoma Alexandria Chicken Coop & Run |
 |
| Country Living Chez Poulet - Comes with plans to build your own |
Here are some of the chicken rearing resources I've been looking at:
UPDATE: We got some chickens weeks after writing this post, chicken envious no longer.
Thursday, August 2, 2012
Dining Room: Before & After
 |
| BEFORE: When we first moved in the floors were carpeted and walls were a high gloss red. |
 |
| AFTER |
The very first thing we did, even before we moved our things in, was refinish the hardwood floors. The downstairs had carpeting, and the upstairs floors were painted mustard and black. Many hours and sand papers went into these floors. Then they were cleaned and stained in a clear stain finish.
The dining room and living room used to be a very bold brick red. I was looking for something more calm, and warm. I choose Martha Stewart’s Oolong tea, a soothing green with yellow undertones. We used Behr Premium paint which has a primer in it. They claim you only need one coat. I have painted a fair amount of walls in my life, and I was skeptical, but now I am the unofficial Behr Premium spokeswoman. It really is worth the money. Some advice, don't let the person at the paint counter tell you can can't use a Martha Stewart color with Behr paint, or vice versa. All they have to do is a color match. Every time I mixed paint this way, they gave me hard time, but it's completely doable. Because I was painting over bold red, I did a coat of Killz primer, then only one coat of the Oolong Tea. This saved me both time and money, bonus! I haven’t gotten to the trim yet; you can see the test swatches on the side. I think I’ll end up doing a slightly softer white, but that’s only on the To-do list for now.
The biggest change we made in this space was knocking out a window between the dining room and front room. We suspect the front room used to be a porch since it’s all exposed brick and there was a perfect window shaped spot that we knocked out to become our bar. This project was taken up by my grandfather, the expert craftsman, also known as Johnny Four Fingers, coined after his close encounter with a circular saw whilst making the bookshelves shown (don't worry he still has all 5 digits!). The whole was cut, drywall and insulation removed. Then we put down a custom laminate counter-top in a textured black matte, that gives the look of stone. The bookshelves were measured, cut, stained and installed by Johnny Four Fingers to our specs. Later we added the glass rack across the window.
Another change, that made a big difference, was swapping out the crystal chandelier. It wasn’t that I didn’t like it, it just didn’t fit with everything else. We replaced it with a Craftsmen style hanging light with a wrought iron finish.
Voila! We now have a cozy dining space for eating, drinking, and reading.


Subscribe to:
Posts (Atom)